Forest Generator is DONE!

Standard

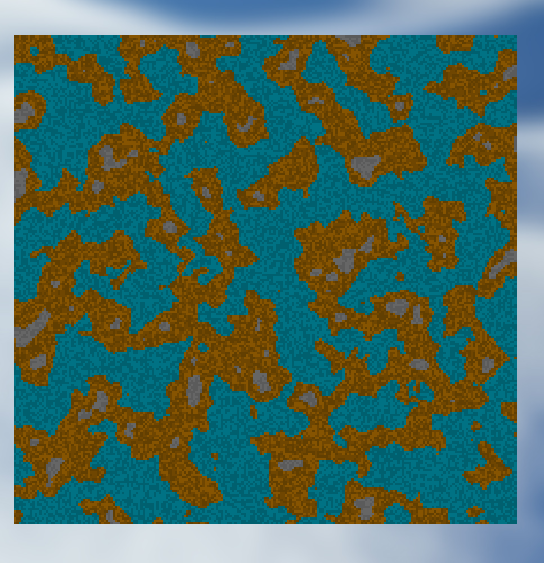
Hello all! Today I finished Forest Generator! But before finishing it, I’ve encountered with bugs that are caused by unimplemented tiles. After implementing Dirt, Tree and Water tiles to the respective tile databases I can show my end result:

forest.gif

The used noises for this map: Value Fractal, Perlin and White Noise. Lots of noise, right?

Value Fractal is used for elevation of the map. Higher values represented as Rocks, meanwhile smaller values are dirt, forest, and water. But I needed to use Perlin and White Noise for Forest areas. I wanted Forest to be independent of other areas and also wanted to be able to adjust its coverage of the map without worrying of rock and water percentage. White Noise is used for the crunchy look of Forest.

What I learned from this generator:

  • I can use multiple noises at once in order to add some spice (variety) on the map. This is useful if you want to adjust a certain element independent of other map elements.
  • Learn your environment. Study the project and act according to the system. Whatever you use, first of all, study and ask what is going on in this project. I had difficulties with tilemap system and turns out I had to correctly initialize newly added tiles in order to use them and integrate them with the map.

I hope I can continue on delivering new generators to you.

Stay in Tune!


Noises vol2.

Standard

Hello all! This week I spent my time more on adjusting the variables of the map earlier I was working on, and I produced more noises, thanks to FastNoise library.

Here you can see the results with different scales and different noises:

Cellular:

Cubic:

Cubic Fractal:

Perlin:

Perlin Fractal:

Value:

Simplex:

Value Fractal:

Whire Noise:

white noise.png

These are the results and I tried to get a result with Fractal noises (for water and rock) and white noise (for forest):

image (8).png

The parameters should be adjusted as well, but in my opinion, these parameters look good. The real struggle is that in Unity’s Perlin Noise the results are positive numbers while in Fast Noise the range for the noise is between -1.0 and 1.0. There are negative numbers to work on as well, so I extended the parameter range according to this. Finding the exact map that suits my taste is kind of hard thing to do but not impossible.

I’ll be updating you when I experience an Evreka moment 🙂 an I’m really eager to release this map with a river added!

So stay in tune!

Noises

Standard

Hello all. This week I studied lots of noise theory for making the new map called “Road with River and Forest”.

When I started to the making the map, I figured out that I needed to apply more advanced noises, like Perlin Noise. Noise is created when we assign a number to a map tile between 1.0 and 0.0. 0.0 is black while 1.0 is white. The Perlin noise looks like this:

I consider this map as an elevation map. White areas are highest points while black areas are the smallest. Think of mountains, hills, valleys, water etc. Also, Perlin noise tends to give the exact same result, so I need to adjust the frequency as well as adding some X and Y offset to give it a “pseudo-randomity.”

And when I apply this noise on the map:

image (4).png

Quite good. But not enough. This is just Perlin noise and wanted to try some other noises as well. This was Unity’s Perlin Noise, so I searched and found a library called FastNoise. I implemented its C# version and got several results:

Cellular Noise:

Cellular2.png

Cubic Noise:

Cubic1.png

Fractal Simplex:

image (5).png

Value Fractal:

image (7).png

The water, dirt, and rock percentages are different from each other. I will continue to adjust the noises and try to create a normal habitat that is straight out of Mother Nature, and also fun to play with.

So stay in tune!


TileMaps and custom editors

Standard

Hello folks! This week I was working on “Road with a River and Trees” generator. But before that Erhan and I wanted to make it more spicy and colorful at the start. We wanted to add different tile types and make it in such a way that you wouldn’t need to change the theme and use it with colors already.

So, for this purpose, first I need an excel sheet. Tileset system works on .csv files that hold IDs, names, and tags for the tiles. According to this information, the tile system generates a class that holds them as new tile objects.

Screenshot_1.png

The new tile I wanted to add was Forest. It will be used for creating random trees on the map.

When the .csv file is imported, the new tile will be seen like this on Inspector:

image (2).png

Now the new tile file is present in Tile Definitions and Tag Definitions on TileSetsDatabase scriptable object. This SO holds the tile variables, and they are accessible in code as well. All I need is to call a tile, I write like this:

Tile.Instance.Forest

But it’s not finished yet. Now I need to create an atlas for this tile. To do this, there’s a built-in atlas creator in ProDnD.

image (3).png

On this atlas creator, I need to select Forest in the list and choose the Forest tile textures from the Project folder. And when I did this I was able to create the result that I wanted:

image (1).png

As you can see, there are tiny little cutie green trees in the map. I hope I will be finishing this generator by next week.

Stay in tune!


More generators. . .

Standard

Hello folks! This week has been spent on researching mostly. (since there are no “catastrophic” bugs, we decided to work on new generators.)

And I came with a few ideas.

IMG_20180110_160645.jpg

These are the new generator ideas. The English names of the maps are (in order): Road with a river and a forest, Arachnophobia, Topography Map, Circular Maze and Treehouse (Elvish)

Road with a river and a forest map is chosen for the new generator idea. Erhan and I exchanged lots of ideas and had a brainstorming session to flesh out the map.

The map consists of a bunch of parameters that adjusts the elements of the map:

Trees:

  • The density of the trees (how much are they scattered or clump?)
  • Number of trees
  • Growth location

River:

  • Length and thickness
  • Meander level
  • Branching

Rocks:

  • Number and size of the rocks
  • Topography of rocks
  • Location

The idea is still fresh so we decided to think on paper. You can check out the sketches we made:

Erhan’s:

20180112_150412.jpg20180112_145414.jpg20180112_150957.jpg

My sketches:

IMG_20180112_150609.jpg

IMG_20180112_153809.jpg

IMG_20180112_152915.jpg

IMG_20180112_143831.jpg

Last but not least, I started to impelement this on Unity:

image

I plan to implement this on next week, so stay in tune!

Update of this week! Games and tutorials!

Standard

Hello! It’s been a wonderful new year event for us and I hope that it’s the same for you!

This week’s update is the Share feature of ProDnD. I fixed the Share button (somehow the needed components were missing so I replaced them) so you can share your maps on Reddit with ease!

Other than that, as Gray Lake Studios, all together we played a board game called “Betrayal At House On The Hill” and I must say it was so much fun! It was my first board game session and surely it’ll be the best one. The game is “procedural” so there were lots of unpredictable moments. We had so much fun and this game session has shown me that board games are a-w-e-s-o-m-e!

We recorded the game session so it’ll be available on YouTube in near future. (The session is Turkish.)

Next thing I’ve done in this week is watching some tutorials about Unity. The first tutorial I’ve watched is about the newest Unity feature, the TileMap. I WAITED for months for this feature and I was so eager to use, but unfortunately, tutorials were kind of late. But the wait is over and you can find it below.

The second tutorial is about SOLID design principle. I’ve decided to get into the design patterns and refresh my memory from school, so I watched some videos about it. They are important aspects of programming and with them, the process gets easier and you’re less prone to make mistakes. You can watch them with these links I’m going to share.

See you in next week!


Last updates of the year ❄

Standard
Hello all! First of all, I wish a Merry Christmas and a happy new year! I hope that this year will bring us more luck, more happiness and more ProDnD maps and lots of merry campaigns…
This week’s been less job and more education. I only did some last minute refactoring and added anchor points to the screenshot. When you print your maps you’ll see tiny red dots on the top right corner. This is an indicator that tells you the orientation of the pages so you won’t be confused.
We prepared our release builds, pushed them to the markets and before the New Year craziness and holiday spirit we decided to have an educational last day of the year at Gray Lake Studios. Our Senior developer Arda has taught us a several Unity and programming tips and tricks, via Unite conference YouTube videos and such. I’m sharing the links with you so you can watch as well.
This video is about SOLID principle and how do you apply this on Unity.
This video is about Entitas, an entity based framework on Unity.
And also you can look at my notes that I took while Arda was lecturing 🙂
p_20171229_144724.jpgp_20171229_144735.jpgp_20171229_144730.jpg
See you in next year! 🙂

Merry Chrismas and happy new year everyone!

Standard

Hello all! This week I brought you some Christmas gifts! Now you can add snow effect on your maps (Thanks to Arda!) and also you can generate a snowflake shaped map!

snowflake.gif

In this map, you can choose three types of snowflakes as well. Different flavors for the snowflake!

snowflake2.gif

I had 4 days to do this map and I researched about snowflake generators on the internet. The things I encountered were more like research papers and Koch snowflake (which I do not prefer because I wanted my snowflake more like branch-y, like trees.). Then I figured it how to do it; making the main branch and then make the other sub-branches that extend from the main branch in a structured way.

Sub-branches extends from the main branch by the amount of sub-branch count. (You can adjust their maximum and minimum branch count values to add some randomity). Also, you can adjust the sub-branch length, main branch length and map size to shape it for your taste.

So here you go, you can use them when the new update arrives! I wish you a very Merry Chrismas and a happy new year!


Screenshot Feature is DONE. Here is what I learnt.

Standard

Hello folks. I really can say that I finished screenshot refactoring… For real. Yes, it took four weeks, it was a slow and a hard process. I didn’t do any extensive refactoring before, and also I didn’t read legacy codes before, neither in my projects nor in school projects. In real life, on the other hand, you’ll be like, always reading others’ codes and implement additional features onto the codes that you never wrote before. And I can say that it really taught me how to do so.

First of all, I suggest you to read and UNDERSTAND the code, carefully. My mistake was to be in rush and passed lots of important things that I needed most. Later I had to read the code, again and again, to find the things that I was searching.

The second lesson is that, planning. What tools, what patterns, what methods, whatever you’ll need, you should decide. Rather than changing methods in the middle of the project, you should plan it before implementing. At the beginning, it may look like unnecessary work and it takes time. However, when you’re done with the planning phase and start coding, you’ll realize that it’ll save your time and energy to use on the essential things. And also it’ll save you from burnout. Because failure upon failure really takes a toll on your stamina and this will hinder your ability to maintain a project later on.

The last but not the least lesson is researching and asking! If I wasn’t eager to ask, I couldn’t be able to learn, especially as a junior developer. For example, I asked about variables that will be used and updated in several classes. Then, my senior made me watch a Unite conference video about scriptable objects and dependency injection. That changed my approach and I was able to pull off the issue and it saved me lots of time and energy. But do not ask mundane and repetitive questions. Because it’ll bore the seniors and also hinder their workflow. So, if you cannot answer your questions by yourself or by searching on the net, then, ask them.

So, these are experiences of my four weeks adventure on Screenshot feature refactoring. I hope that I will be more knowledgeable and faster in future.

Stay in tune!